Anvil
.png)
| Gravity |
No |
| Tool |
|
| Stackable |
No |
| Flammable |
No |
| Weight ⚖ |
Heavy |
| Size ↕ |
Huge |
| BlockID |
terrafirmacraft:Anvil |
Contents
Obtaining
Stone
Stone anvils are created by right-clicking with a Hammer on the top of a Raw Igneous¹ Stone block, distinguishable by its decreased height. Right click the anvil to open the GUI and place the hammer inside to keep the anvil from turning back into a regular stone block.
| ¹Igneous Stone | ||||
|---|---|---|---|---|
| Igneous Intrusive | |
|
|
|
| Igneous Extrusive | |
|
|
|
Metal
Metal Anvils are crafted with Double Ingots.
| |
|
|
|
|
| |
||||
| |
|
|
Usage
Anvils are the crafting interface for nearly all advanced tools and armors.
| Input | Work Type | Output |
|---|---|---|
| Plan selector | ||
| Weld | ||
| Plan selector | ||
| Armor Process¹ | ||
| Hammer² | ||
| Weld | ||
| Armor Process¹ | ||
| Plan selector |
| ¹ | Further information: Armor
|
| ² | Further information: Bucket
|
Video
Tiers
There are a number of different anvils, divided into tiers. Each tier is able to work more difficult metals than the previous tiers. Anvils can weld ingots one tier higher together into double ingots. All other smithing must be done on an anvil of equal or higher tier.
For Example: Stone anvils can only weld Copper Ingots. Copper anvils can weld Bronze Ingots and work Copper Ingots.
| Tier | Anvil | Weld Ingots | Work Metal |
|---|---|---|---|
| Tier 0 | |
Tier 0 - 1 | None |
| Tier 1 | |
Tier 0 - 2 | Tier 1 |
| Tier 2 | |
Tier 0 - 3 | Tier 1 - 2 |
| |
Tier 0 - 3 | Tier 1 - 2 | |
| |
Tier 0 - 3 | Tier 1 - 2 | |
| |
Tier 0 - 3 | Tier 1 - 2 | |
| Tier 3 | |
Tier 0 - 4 | Tier 1 - 3 |
| Tier 4 | |
Tier 0 - 5 | Tier 1 - 4 |
| Tier 5 | |
Tier 0 - 6 | Tier 1 - 5 |
| Tier 6 | |
Tier 0 - 6 | Tier 1 - 6 |
| |
Tier 0 - 6 | Tier 1 - 6 |
Anvil GUI

|
|
Working
Smithing metal items, or working them, is a difficult process in TerraFirmaCraft. Before beginning, make sure your basic requirements are met. For basic working, you will need:
- A hammer in slot 4 (having backups handy is also a good idea).
- A metal item heated to working temperature.
- Access to a firepit or forge for reheating (as needed).
Once you are ready with your heated metal item, place it in slot 1 and select what you want to make using button 3.
Plan Selector

After placing a metal item in slot 1 and pressing button 3, an interface will appear showing all possible anvil recipes for that item. Note: If the metal item is too high of a tier for the anvil to work, no options will appear. Remember that a metal item can only be worked on an anvil of the same or higher tier.
After selecting a plan, an image of the planned item will appear on button 3 and the red arrow in the progress bar will move to a new location on the progress bar. We must use the red and green techniques (9 & 10) to move the green arrow so that it lines up again with the red arrow.
Techniques
| Hit, Light | 
|
Hit, Medium | Punch | 
|
Bend | |
| Hit, Heavy | Draw | Upset | Shrink |
Each red technique moves the green arrow further to the left. Each green technique moves the green arrow further to the right. The severity of the movement increases as you use stronger techniques, increasing from left to right, top to bottom for each of the two colors.
Important - You cannot move the red arrow, only the green one. If you move the green arrow beyond the boundaries of the progress bar, you will have overworked your metal, and the ingot or unshaped metal will be lost.
Rules
Unfortunately, simply lining up the arrows is not enough, you must also meet the rules. The rules will dictate what the final three techniques must be to finish the time. For instance, to make a metal sheet from a double ingot, the rules dictate the final three techniques must all be "Hit". "Hit" is a red technique, and moves the green arrow to the left, thus you must move the green arrow to the right beyond the red arrow so that the three hits will line up the arrows properly. Note: Any of the three Hits (Light, Medium Heavy) will satisfy the "Hit" rule.
Each technique used adds an icon to the rules row, feeding in from the left to the right. The most recent technique being the icon on the farthest left. The horizontal lines beneath the required rules show when those rules should be used.
Looking at the example shown in the anvil GUI picture above we see that the required rules for finishing the tool is:
- Punch, Last
- Bend, Not Last
- Draw, Not Last
The order in which you bend or draw can be switched, but the punch must be last.
Welding
To weld two items together, they must both be heated above workable temperature (just a bit below melting temp). You must also have flux in slot 5, and a hammer in slot 4. To weld the two items, place them in the input slots of area 6 and press the "Weld" button. If all requirements have been met, your welded item will appear in the output slot of area 6.
Configuration
| Option | Default Value |
Description |
|---|---|---|
| anvilrulecolor0 | Border colour of the leftmost rule in the anvil GUI. | |
| Blue | 36 | Blue component of color. Ranges from 0 to 255.
|
| Green | 28 | Green component of color. Ranges from 0 to 255.
|
| Red | 37 | Red component of color. Ranges from 0 to 255.
|
| anvilrulecolor1 | Border colour of the middle rule in the anvil GUI. | |
| Blue | 34 | Blue component of color. Ranges from 0 to 255.
|
| Green | 101 | Green component of color. Ranges from 0 to 255.
|
| Red | 242 | Red component of color. Ranges from 0 to 255.
|
| anvilrulecolor2 | Border colour of the rightmost rule in the anvil GUI. | |
| Blue | 49 | Blue component of color. Ranges from 0 to 255.
|
| Green | 148 | Green component of color. Ranges from 0 to 255.
|
| Red | 247 | Red component of color. Ranges from 0 to 255.
|
Achievements
- Main article: Achievements
| Icon | Achievement | In-game description | Prerequisites | Actual requirements (if different) |
|---|---|---|---|---|
 |
Hammer Time | Make a stone anvil | Paleolithic! | Right click with a hammer on top of a raw igneous stone block. |
| |
The Bronze Age | Craft a bronze anvil to enter the Bronze age | Chalcolithic! | Pull a bronze anvil out of the output slot of a crafting grid. |
History
| Beta | ||
|---|---|---|
| v1 | Added all anvil recipes. | |
| v1f Hotfix 1 | Clarified the rules text on the anvil when it says Hammer. Now reads Hit. | |
| v2 Build 3 | Added three new tier 2 anvils to provide alternate routes past Bronze. (Bismuth Bronze, Black Bronze, Rose Gold) | |
| v2 Build 13 | Implemented a range that is needed to be reached in order complete a crafting recipe. The farther from the center, the more of a durability loss that the resulting item will receive. | |
| To compensate for how easy this makes smithing, all recipes are random. | ||
| v2 Build 27 | Modified how a few Anvil Rules are worded in order to clarify them. May stretch off screen slightly in lower resolutions. | |
| v2 Build 40 | Added new sound effects for working on an anvil. | |
| v2 Build 47 | Changed creation of stone anvils to right clicking on the top of a raw stone block with a hammer. Turns raw stone into a temporary stone anvil as long as the GUI is open. | |
| v2 Build 47c | Removed crafting recipe for stone anvils. | |
| v2 Build 49 | Stone anvils are now semi permanent. As long as a hammer is in the hammer slot when the gui is closed, it will stay an anvil, otherwise it will revert to the stone type it was before. | |
| Stone anvil creation is no longer tied to the dominate rock layer but the Igneous Intrusive/Extrusive restriction is back in effect. | ||
| Stone anvils render the hammer icon on the surface. | ||
| v2 Build 52d | Anvils are considered Huge/Heavy. | |
| Build 72 | Added anvil recipes for non tool-metal sheets and weld recipes for 2x sheets (Brass, Gold, Lead, Nickel, Pig Iron, Platinum, Silver, Sterling Silver). | |
| Build 76 | Anvils render as blocks in your inventory instead of 2D textures. | |
| 77.0 | Implemented new Anvil GUI. | |
| 77.10 | Anvils can be melted in a crucible | |
| Flux slot accepts a full stack of 64. | ||
| 77.11 | Volume of working sound effect lowered. | |
| Removed all LASTTHREE rules. | ||
| 78.0 | Anvils render the item in the working slot on top in addition to the hammer. | |
| Removed plans slots from GUI and added plan selector button and skills display. | ||
| Replaced +/- 5 red arrow range with a single arrow. All smithing must now land exactly on the center of the arrow. | ||
| Added smithing skill gains from using the anvil. | ||
Trivia
- The position of the red arrow on the progress bar for each tool recipe is dependent on the world seed. Because of this, a combination of techniques to make a perfect tool in one world, will not work in another world of a different seed.
Gallery
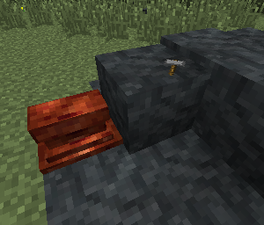
A stone anvil made from exposed basalt(right) next to a copper anvil(left).
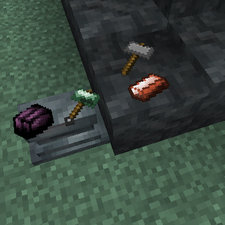
The hammer and the item in the working input slot rendered on top of the anvil.


| Navigation | |
|---|---|
| Construction | Barrels • Blueprints • Bricks • Firepit • Plank Blocks • Protection Meter • Quern • Smooth Stone • Straw & Hide Bed • Support Beams • Thatch |
| Environment | Altitude • The Player • Calendar • Cobblestone • Logs • Mobs • Saplings • Seasons • Stone • Temperature • Trees |
| Food | Agriculture • Animal Husbandry • Berries • Fruit Trees |
| Materials | Charcoal • Coal • Double Ingots • Double Sheets • Flux • Gems • Gunpowder • Hides • Ingots • Leather • Lumber • Minerals • Pottery • Redstone/Powders • Sheets • Sticks • Straw • Unshaped Metal • Wool |
| Metalworking | Alloys • Anvils • Armor • Bellows • Blast Furnace • Bloomery • Tool Molds • Crucible • Forge • Gold Pan • Metals • Ores • Sluice |
| Tools & Weapons | Arrows • Axe • Buckets • Chisel • Firestarter • Flint & Steel • Hammer • Hoe • Javelin • Knife • Mace • Pickaxe • Prospector's Pick • Saw • Shovel • Sword • Scythe • Shears • Spindle |
| Other | Crafting Differences • Item Index |